13、自动扫描注册bean对象
13、自动扫描注册bean对象
1、目标
到目前为止我们已经实现了spring中ioc和 aop中绝大部分内容,只不过还是需要用户在xml中配置bean对象的依赖关系才能使用,参考当前spring的实现,用户不在需要写太多的配置,只需要在目标类上添加几个注解,spring就可以自动扫描然后注册到容器中,这个过程中就包括了包的扫描解析和注册,注解配置使用,占位符属性填充等内容,因此本章节我们就实现自动注解的配置功能。
2、设计
首先我们要考虑,为了可以简化 Bean 对象的配置,让整个 Bean 对象的注册都是自动扫描的,那么基本需要的元素包括:扫描路径入口、XML解析扫描信息、给需要扫描的Bean对象做注解标记、扫描Class对象摘取Bean注册的基本信息,组装注册信息、注册成Bean对象。那么在这些条件元素的支撑下,就可以实现出通过自定义注解和配置扫描路径的情况下,完成 Bean 对象的注册。除此之外再顺带解决一个配置中占位符属性的知识点,比如可以通过 ${token} 给 Bean 对象注入进去属性信息,那么这个操作需要用到 BeanFactoryPostProcessor,因为它可以处理 在所有的 BeanDefinition 加载完成后,实例化 Bean 对象之前,提供修改 BeanDefinition 属性的机制 而实现这部分内容是为了后续把此类内容结合到自动化配置处理中 。
通过bean的生命周期,在加载注册bean对象的时候,自动扫描也只是扫描特定注解的类,然后获取该类信息封装成BeanDefinition对象注册到容器中即可。
在XmlBeanDefinitionReader中解析<context:component-scan />标签,扫描类组装BeanDefinition然后注册到容器中的操作在ClassPathBeanDefinitionScanner#doScan中实现。
自动扫描注册主要是扫描添加了自定义注解的类,在xml加载过程中提取类的信息,组装 BeanDefinition 注册到 Spring 容器中。 所以我们会用到 <context:component-scan /> 配置包路径并在 XmlBeanDefinitionReader 解析并做相应的处理。这里的处理会包括对类的扫描、获取注解信息等 最后还包括了一部分关于 BeanFactoryPostProcessor 的使用,因为我们需要完成对占位符配置信息的加载,所以需要使用到 BeanFactoryPostProcessor 在所有的 BeanDefinition 加载完成后,实例化 Bean 对象之前,修改 BeanDefinition 的属性信息。这一部分的实现也为后续处理关于占位符配置到注解上做准备
3、实现
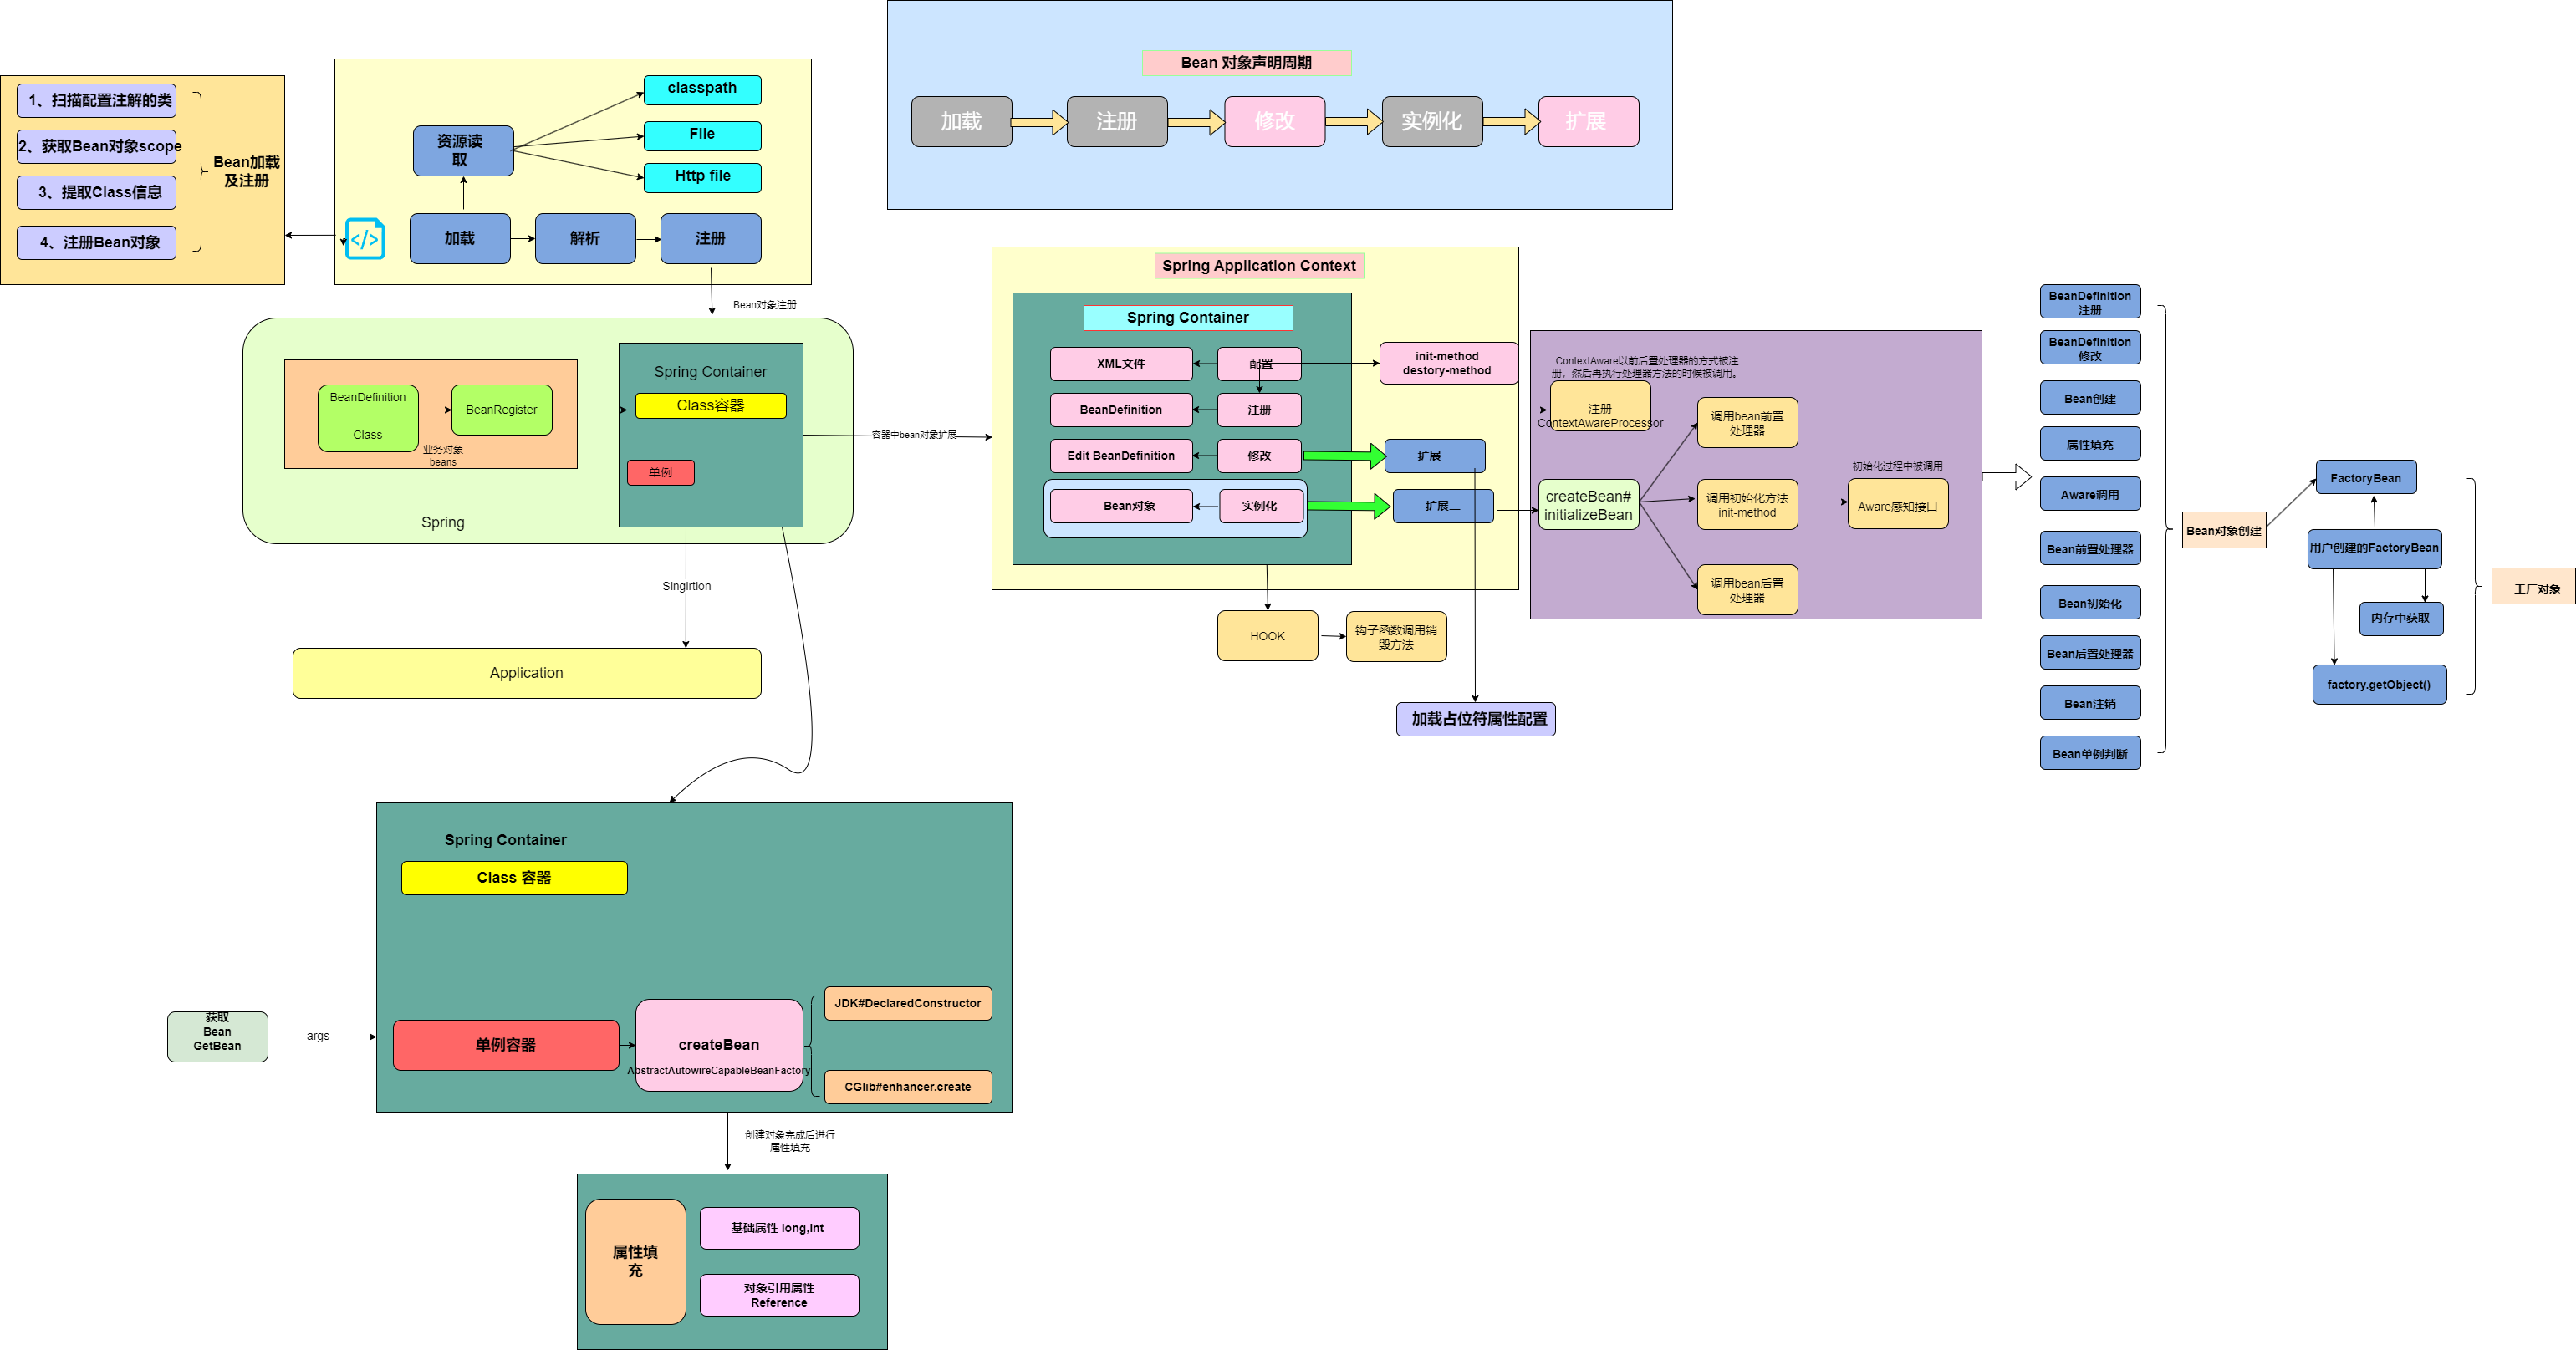
3.1、核心实现类图
从类结构上看,主要是XmlBeanDefinitionReader类中的doLoadBeanDefinitions方法,在此方法中调用ClassPathScanningCandidateComponentProvider类中的方法逻辑,主要工作是根据包名,自动扫描包中被标注注解的类,然后返回具体的class信息。 因此就可以在加载阶段,自动实现根据包名扫描包路径下所有的类,将标注注解的class注册到容器中。
PropertyPlaceholderConfigurer 目前看上去像一块单独的内容,后续会把这块的内容与自动加载 Bean 对象进行整合,也就是可以在注解上使用占位符配置一些在配置文件里的属性信息,此类实现BeanFactoryPostProcessor接口,因为BeanFactoryPostProcessor可以在加载完成BeanDefinition后对定义进行修改,所以加载配置文件中的属性就需要再注册完成定义后,进行填充。
3.2、处理占位符配置
public class PropertyPlaceholderConfigurer implements BeanFactoryPostProcessor {

//    处理占位符配置
    /**
     * Default placeholder prefix: {@value}
     */
    public static final String DEFAULT_PLACEHOLDER_PREFIX = "${";

    /**
     * Default placeholder suffix: {@value}
     */
    public static final String DEFAULT_PLACEHOLDER_SUFFIX = "}";

    private String location;

    @Override
    public void postProcessBeanFactory(ConfigurableListableBeanFactory beanFactory) throws BeansException {
        // 加载属性文件
        try {
            DefaultResourceLoader resourceLoader = new DefaultResourceLoader();
            Resource resource = resourceLoader.getResource(location);
            Properties properties = new Properties();
            properties.load(resource.getInputStream());

            String[] beanDefinitionNames = beanFactory.getBeanDefinitionNames();
            for (String beanName : beanDefinitionNames) {
                BeanDefinition beanDefinition = beanFactory.getBeanDefinition(beanName);

                PropertyValues propertyValues = beanDefinition.getPropertyValues();
                for (PropertyValue propertyValue : propertyValues.getPropertyValues()) {
                    Object value = propertyValue.getValue();
                    if (!(value instanceof String)) continue;
                    String strVal = (String) value;
                    StringBuilder buffer = new StringBuilder(strVal);
                    int startIdx = strVal.indexOf(DEFAULT_PLACEHOLDER_PREFIX);
                    int stopIdx = strVal.indexOf(DEFAULT_PLACEHOLDER_SUFFIX);
                    if (startIdx != -1 && stopIdx != -1 && startIdx < stopIdx) {
                        String propKey = strVal.substring(startIdx + 2, stopIdx);
                        String propVal = properties.getProperty(propKey);
                        buffer.replace(startIdx, stopIdx + 1, propVal);
                        propertyValues.addPropertyValue(new PropertyValue(propertyValue.getName(), buffer.toString()));
                    }
                }
            }
        } catch (IOException e) {
            throw new BeansException("Could not load properties", e);
        }
    }

    public void setLocation(String location) {
        this.location = location;
    }
}
BeanFactoryPostProcessor可以修改Befintiion的定义,所以加载属性通过实现此接口,完成对配置文件的架子啊以及获取占位符中的属性在文件里的配置。
3.3、定义拦截注解
定义Scope注解:
@Target({ElementType.TYPE, ElementType.METHOD})
@Retention(RetentionPolicy.RUNTIME)
@Documented
public @interface Scope {

    String value() default "singleton";
}
用于配置作用域的自定义注解,方便通过配置Bean对象注解的时候,拿到Bean对象的作用域。不过一般都使用默认的 singleton
定义Component注解
@Target(ElementType.TYPE)
@Retention(RetentionPolicy.RUNTIME)
@Documented
public @interface Component {

    String value() default "";
}
Component注解主要用来配置在Controller,Service中,比较通用的注解,需要自动加载到容器中的对象都可以标注此注解。
3.4、对象扫描装配
public class ClassPathScanningCandidateComponentProvider {

    public Set<BeanDefinition> findCandidateComponents(String basePackage) {
        Set<BeanDefinition> candidates = new LinkedHashSet<>();
        Set<Class<?>> classes = ClassUtil.scanPackageByAnnotation(basePackage, Component.class);
        for (Class<?> clazz : classes) {
            candidates.add(new BeanDefinition(clazz));
        }
        return candidates;
    }
}
这里先要提供一个可以通过配置路径 basePackage=cn.bugstack.springframework.test.bean,解析出 classes 信息的工具方法 findCandidateComponents,通过这个方法就可以扫描到所有 @Component 注解的 Bean 对象了。
public class ClassPathBeanDefinitionScanner extends ClassPathScanningCandidateComponentProvider {


    private BeanDefinitionRegistry registry;

    public ClassPathBeanDefinitionScanner(BeanDefinitionRegistry registry) {
        this.registry = registry;
    }

    public void doScan(String... basePackages) {
        for (String basePackage : basePackages) {
            Set<BeanDefinition> candidates = findCandidateComponents(basePackage);
            for (BeanDefinition beanDefinition : candidates) {
                // 解析 Bean 的作用域 singleton、prototype
                String beanScope = resolveBeanScope(beanDefinition);
                if (StrUtil.isNotEmpty(beanScope)) {
                    beanDefinition.setScope(beanScope);
                }
                registry.registerBeanDefinition(determineBeanName(beanDefinition), beanDefinition);
            }
        }
    }

    private String resolveBeanScope(BeanDefinition beanDefinition) {
        Class<?> beanClass = beanDefinition.getBeanClass();
        Scope scope = beanClass.getAnnotation(Scope.class);
        if (null != scope) return scope.value();
        return StrUtil.EMPTY;
    }

    private String determineBeanName(BeanDefinition beanDefinition) {
        Class<?> beanClass = beanDefinition.getBeanClass();
        Component component = beanClass.getAnnotation(Component.class);
        String value = component.value();
        if (StrUtil.isEmpty(value)) {
            value = StrUtil.lowerFirst(beanClass.getSimpleName());
        }
        return value;
    }
}
ClassPathBeanDefinitionScanner 是继承自 ClassPathScanningCandidateComponentProvider 的具体扫描包处理的类,在 doScan 中除了获取到扫描的类信息以后,还需要获取 Bean 的作用域和类名,如果不配置类名基本都是把首字母缩写。
3.5、解析xml中调用扫描
public class XmlBeanDefinitionReader extends AbstractBeanDefinitionReader {

    /**
     *公共的加载xml文件的方法
     * @param inputStream
     * @throws ClassNotFoundException
     */
    protected void doLoadBeanDefinitions(InputStream inputStream) throws ClassNotFoundException, DocumentException {
        SAXReader reader = new SAXReader();
        Document document = reader.read(inputStream);
        Element root = document.getRootElement();

        // 解析 context:component-scan 标签,扫描包中的类并提取相关信息,用于组装 BeanDefinition
        Element componentScan = root.element("component-scan");
        if (null != componentScan) {
            String scanPath = componentScan.attributeValue("base-package");
            if (StrUtil.isEmpty(scanPath)) {
                throw new BeansException("The value of base-package attribute can not be empty or null");
            }
            scanPackage(scanPath);
        }

        List<Element> beanList = root.elements("bean");
        for (Element bean : beanList) {


            // 注册 BeanDefinition
            getRegistry().registerBeanDefinition(beanName, beanDefinition);
        }
    }

    private void scanPackage(String scanPath) {
        String[] basePackages = StrUtil.splitToArray(scanPath, ',');
        ClassPathBeanDefinitionScanner scanner = new ClassPathBeanDefinitionScanner(getRegistry());
        scanner.doScan(basePackages);
    }
}
关于 XmlBeanDefinitionReader 中主要是在加载配置文件后,处理新增的自定义配置属性 component-scan,解析后调用 scanPackage 方法,其实也就是我们在 ClassPathBeanDefinitionScanner#doScan 功能。 另外这里需要注意,为了可以方便的加载和解析xml,XmlBeanDefinitionReader 已经全部替换为 dom4j 的方式进行解析处理
4、测试
4.1、测试用例
Service对象
@Component("userService")
public class UserService implements IUserService {

    private String token;

    public String queryUserInfo() {
        try {
            Thread.sleep(new Random(1).nextInt(100));
        } catch (InterruptedException e) {
            e.printStackTrace();
        }
        return "bugcode,100001,深圳";
    }

    public String register(String userName) {
        try {
            Thread.sleep(new Random(1).nextInt(100));
        } catch (InterruptedException e) {
            e.printStackTrace();
        }
        return "注册用户:" + userName + " success!";
    }
}
实现Service对象,并且在Service中使用了Component进行标注,另外在类中定义tocken属性,xml在加载的时候,会自动读取配置文件中的配置注册。
属性配置
# Config File
system.key=OLpj9823dZ
xml配置文件
spring-property.xml
<?xml version="1.0" encoding="UTF-8"?>
<beans xmlns="http://www.springframework.org/schema/beans"
       xmlns:xsi="http://www.w3.org/2001/XMLSchema-instance"
       xmlns:context="http://www.springframework.org/schema/context"
       xsi:schemaLocation="http://www.springframework.org/schema/beans
	         http://www.springframework.org/schema/beans/spring-beans.xsd
		 http://www.springframework.org/schema/context">

    <bean class="bugcode.online.springframework.beans.factory.PropertyPlaceholderConfigurer">
        <property name="location" value="classpath:token.properties"/>
    </bean>

    <bean id="userService" class="bugcode.online.springframework.bean.UserService">
        <property name="token" value="${token}"/>
    </bean>

</beans>
加载 classpath:token.properties 设置占位符属性值 $
xml文件配置
<?xml version="1.0" encoding="UTF-8"?>
<beans>


    <bean id="userService" class="bugcode.online.springframework.bean.UserService"/>

    <bean class="bugcode.online.springframework.aop.framework.autoProxy.DefaultAdvisorAutoProxyCreator"/>

    <bean id="beforeAdvice" class="bugcode.online.springframework.bean.UserServiceBeforeAdvice"/>

    <bean id="methodInterceptor" class="bugcode.online.springframework.aop.framework.adapter.MethodBeforeAdviceInterceptor">
        <property name="advice" ref="beforeAdvice"/>
    </bean>

    <bean id="pointcutAdvisor" class="bugcode.online.springframework.aop.aspectj.AspectJExpressionPointcutAdvisor">
        <property name="expression" value="execution(* bugcode.online.springframework.bean.IUserService.*(..))"/>
        <property name="advice" ref="methodInterceptor"/>
    </bean>
</beans>
在配置中,首先将Service,beforeAdvice,methodInterceptor对象交给spring容器管理,然后就可以在切面表达式中对service中的对象进行拦截扩展。
spring-scan.xml
<?xml version="1.0" encoding="UTF-8"?>
<beans xmlns="http://www.springframework.org/schema/beans"
       xmlns:xsi="http://www.w3.org/2001/XMLSchema-instance"
       xmlns:context="http://www.springframework.org/schema/context"
       xsi:schemaLocation="http://www.springframework.org/schema/beans
	         http://www.springframework.org/schema/beans/spring-beans.xsd
		 http://www.springframework.org/schema/context">

    <context:component-scan base-package="bugcode.online.springframework.bean"/>

</beans>
添加 component-scan 属性,设置包扫描根路径
4.2、测试结果
测试占位符
@Test
    public void test_scan() {
        ClassPathXmlApplicationContext applicationContext = new ClassPathXmlApplicationContext("classpath:spring-scan.xml");
        IUserService userService = applicationContext.getBean("userService", IUserService.class);
        System.out.println("测试结果:" + userService.queryUserInfo());
    }
结果
测试结果:UserService#token = { RejDlI78hu223Opo983Ds }

Process finished with exit code 0
测试包扫描
    @Test
    public void test_scan_1() {
        ClassPathXmlApplicationContext applicationContext = new ClassPathXmlApplicationContext("classpath:spring-scan.xml");
        IUserService userService = applicationContext.getBean("userService", IUserService.class);
        System.out.println("测试结果:" + userService.queryUserInfo());
    }
测试结果
测试结果:bugcode,100001,深圳

Process finished with exit code 0
5、小结
通过对之前Bean生命周期的理解,可以发现现在给Spring容器添加功能已经很容易了,第一步只需要定义出某个功能,第二部是将功能串联到bean的生命周期中即可。
比如本章中自定义的注解扫描,需要定义出自动扫描包下标注注解的类,然后将此类注册到容器中,因此首先将功能组件开发出来,接着将功能集成到xml文件读取加载中即可。
所以在学习spring过程中,spring本身是帮我我们管理Bean对象,所以一切都围绕着bean的生命周期在开发,因此需要深刻理解一下bean对象的生命周期,以后在扩展功能的时候就很方便扩展到生命周期的某一个阶段。
贡献者
 codingLab
版权所有
版权归属:
许可证: